In this article I’ll quickly go through some of the steps required to install and configure qmail and vpopmail. I’ll assume that you are familiar with the Gentoo linux distribution and is package manager. We’ll configure qmail to receive SMTP connections on ports 25 and 2525.
For this article I’ll assume that you have a machine with the IP 123.345.567.789 and the domain mydomain.com.
Initial Setup
I have the following global USE flags set in /etc/make.conf.
We want to disable maildrop for vpopmail. I’ll show you how we can use maildrop in later articles. I prefer to disable mysql support as I find vpopmail easier to setup and backup without it.
Installation
We’ll install in two stages, qmail first and then vpopmail. I find this removes a few circular dependency problems.
[ebuild N ] mail-mta/netqmail-1.06 USE=”authcram qmail-spp ssl -gencertdaily -highvolume -mailwrapper -vanilla” 0 kB
> emerge mail-mta/netqmail
> source /etc/profile
The last command is important as we need to pick up the new environment before we continue installing packages.
[ebuild N ] net-mail/vpopmail-5.4.26 USE=”-clearpasswd -ipalias -maildrop -mysql” 0 kB
> emerge net-mail/vpopmail
> source /etc/profile
Configuring
We’ll now configure qmail and its certificate.
update the req_dn section
Next we need to configure qmail to query vpopmail when checking passwords
-
TCPSERVER_OPTS="${TCPSERVER_OPTS} -R"
-
#QMAIL_TCPSERVER_PRE="${QMAIL_TCPSERVER_PRE} envdir /etc/relay-ctrl relay-ctrl-chdir"
-
#QMAIL_SMTP_PRE="${QMAIL_SMTP_PRE} relay-ctrl-check"
-
QMAIL_SMTP_CHECKPASSWORD="/var/vpopmail/bin/vchkpw"
-
[[ -n "${QMAIL_SMTP_CHECKPASSWORD}" ]] && {
-
[[ -z "${QMAIL_SMTP_POST}" ]] && QMAIL_SMTP_POST=/bin/true
-
QMAIL_SMTP_POST="${QMAIL_SMTP_CHECKPASSWORD} ${QMAIL_SMTP_POST}"
-
}
This next step is optional but has solved a few issues when running qmail on my VPS. This step increases the memory when processing emails.
Now we need to configure the qmail services. There are instructions within the tcp.qmail-smtp.
> nano -w tcp.qmail-smtp
123.345.567.789:allow,RELAYCLIENT=”",RBLSMTPD=”"
:allow
> ln -s /var/qmail/supervise/qmail-send /service/qmail-send
> ln -s /var/qmail/supervise/qmail-smtpd /service/qmail-smtpd
Now we’ll setup qmail to run on port 2525 as well as 25. I prefer to not hardcode the port number in the configuration files. Instead I like to add the port number in the services file.
We can then duplicate the qmail smtp service and modify the run script so that it will listen on port 2525.
> nano -w /var/qmail/supervise/qmail-smtp2d/run
-
…
-
. /var/qmail/bin/qmail-config-system && \
-
export TCPSERVER_PORT=smtp2 && \
-
exec /usr/bin/softlimit ${SOFTLIMIT_OPTS} \
-
…
Qmail should now be configured but not running. Next we need to configure vpopmail. We’ll add our domain and a user called mark. Both steps require you to specify a password.
> vadduser mark@mydomain.com [[mark's password]]
Now we can setup the default delivery rules.
By default, mail that is not addressed to a known mailbox will be bounced back to the sender. You can instead forward this unhandled email to a user.
| /var/vpopmail/bin/vdelivermail ” mark@mydomain.com
The following steps will forward email address to root,postmaster,mailer-daemon and webmaster @mydomain.com to mark@mydomain.com. The last two commands below correct file ownership and permissions.
> echo mark@mydomain.com > .qmail-postmaster
> echo mark@mydomain.com > .qmail-mailer-daemon
> echo mark@mydomain.com > .qmail-webmaster
> chown vpopmail:vpopmail .qmail-*
> chmod go-rwx .qmail-*
You can find out more about Qmail’s .qmail- files by reading the dot-qmail man page.
Run
The last step is to start qmail.
> /etc/init.d/svscan start
Next Steps
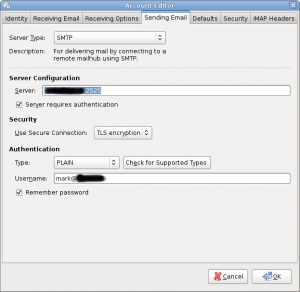
We have now configured our machine to receive email for mydomain.com. Qmail will not relay any email to any other domain unless it comes from a source we specified in the /etc/tcprules.d/tcp.qmail-smtp file. In order for your users to use qmail to send email on to other domains you need to configure your email client to securely authenticate itself. Configure your email clients outgoing SMTP connection to use TLS and enter your username and password as specified in the previous vadduser command.

SMTP Setup
The next step is to configure a method that will allow you to collect/read your email. I’ll discuss this in other articles along spam and virus checking and server side email filtering using maildrop.
Related posts:
Follow me on Twitter.
Grab my RSS Feed.